Making your own pure maple syrup really requires two basic skills: how to run a drill and how boil water. If you have a couple trees and some time, you can be a backyard sugarmaker.

The key piece of info many beginners miss: the season is super short and usually starts in mid-February and ends in late March! Don’t miss out because once the trees bud out, you’ll have to wait for next year.
This article has lots of details at the end and you can find tons more in our blog (here) but here’s a short run-down of the basics. If you subscribe to our newsletter (here), we’ll send out our digital Quick Guide to Maple Tapping that walks you through the process.
If you’re ready to get started this season, click over here to browse supplies.
Maple Tapping Basics
When to Tap Maple Trees?
You must live in an area where (in late winter) the temperature range dips below freezing at night and above freezing during the day. This usually occurs in mid-February to late March. Once trees bud out, season is done.
Maple Tapping Tools.
For tapping: Drill with a 5/16” wood-boring drill bit; small hammer, taps (or spiles); tubing or buckets; additional food-grade buckets for collection.
For syrup making: Large pots for boiling, smaller pots for finish boil (most beginners use an outside “turkey cooker”); filters designed for sugarmaking; a candy thermometer; canning jars and lids; basic kitchen tools like potholders.
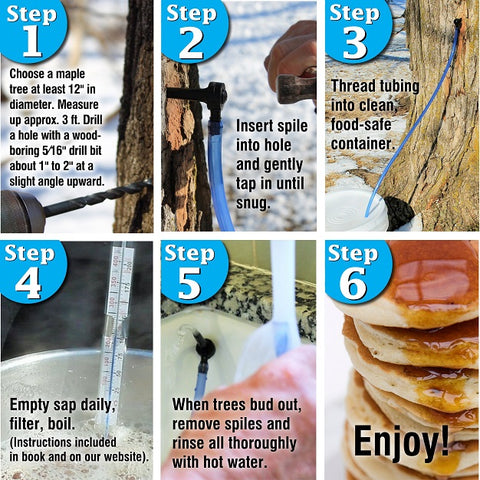
Step One: Pick a tree at least 12” in diameter. Drill a hole 1½” at a slightly upward angle. Insert the spile and gently tap in until snug. Attach the bucket.
Step Two: Collect the sap each day, run through the prefilter, and either boil or keep cold until you’re ready to boil.
Step Three: Boil! When sap reaches 216°F, run through the prefilter into a small pan and continue boiling.
Step Four: When syrup reaches 219°F, run through prefilter combined with thicker filter directly into jars. Tighten lids, lay jars on their sides for 24 hours, and store indefinitely. Once opened, syrup must be refrigerated.
That is really all you need to do! There are additional tools and techniques that more advanced sugarmakers use. Everything you need to know is included in our books, our blogs, and the Quick Start Instruction sheet. Give it a try, you'll love this new outdoor winter hobby and its sweet reward.

Common Maple Syrup Making Questions
What kind of trees can I tap?
Hard maples, also called sugar maple, black maple, or rock maple, have the highest sugar content and produce the best tasting syrup. You can also tap the red or silver maple but the sugar content is lower so you’ll have lower syrup yields and longer boil times. Folks also tap the box elder tree and the finished product has a heavy, sorghum-like flavor. Refer to an illustrated tree guide for identification tips or look in our book, Guide to Maple Tapping, for more information.
What parts of the country produce maple sap?
Because the sap “run” is triggered by the freeze-thaw cycle, maple syrup is only produced in the Upper Midwest, the Northeastern U.S., and Canada.
When should I tap trees?
The tapping season varies from region to region but generally starts in February and can last until mid-April. When the sap starts and stops running depends greatly on day and nighttime temperature fluctuations. Watch the weather forecast – sap starts flowing when the temperatures are below freezing at night but climb to the 40°F and above range during the day. If this freeze/thaw pattern is predicted, get out and tap your trees! Remove your taps when you have enough sap or when the tree buds out as that can lead to an off or “buddy” flavor in the finished syrup.
Does tapping hurt the tree?
If the tree is healthy when tapped and proper tapping procedures are followed, the taphole will start healing within weeks of the spile’s removal. Many maple tree farms have been tapping the same trees for over 100 years. Each taphole, however, must be placed in a different spot on the tree from the previous year. One thing to note: the bottom 4- to 6-foot "tapping zone” will result in trees that are less valuable if cut down for lumber.
Do I need special tools for tapping?
Yes: you will need spiles or taps, something to collect your sap in, and a method of attaching it to the spile. Two of the kits we have available are all-in-one systems where the spile, hook, and bag or bucket all fit together right on the tree. We also sell a tubing kit which comes with the taps inserted into the lengths of tubing which you then can direct into a bucket or use as droplines connected to a common line that leads into a bucket.
You will also need to take a few extra tools with you to the sugarbush – most of which you probably already own. A few necessities include: a drill with a wood-boring drill bit (5/16” or 7/16” depending on the spile you’re using); a marker; a small hammer; and a few five-gallon, food-grade buckets to transfer your collected sap. Depending on which type of kit you buy, you might also need jugs or buckets for collecting at each tree. Our deluxe kits include many of these extra tools.
What’s the difference between a 7/16” and a 5/16” spile?
Previous generations of sugarmakers used a 7/16” spile but research in the last decade has shown that a 5/16” spile (sometimes called the “health spile” or “tree saver spile”) causes less damage to the tree, allows for faster taphole healing, and does not reduce the sap yield when used with gravity systems such as tubing or buckets. Whenever possible, Maple Tapper uses the 5/16” spile in our kits.
How much sap or syrup will I get from each taphole?
The amount of sap each taphole yields varies greatly depending on the tree, the time of year, environmental conditions such as the weather and soil conditions, and even at what point you are in the tapping season. In a normal season, a single taphole produces approximately 10- to 12-gallons of sap. Your finished yield of syrup will depend on the sugar content of your sap. Generally, assume a 40-to-1 conversion – so 12 gallons of sap will boil down to 1 quart of syrup. With this ratio in mind, you’d need four tapholes to produce one gallon of syrup for the season.
What makes sap into syrup?
Sap becomes syrup as the water is removed through evaporation and the sugars become concentrated. The flavor of your finished syrup is created by the caramelization of the sugars during the boiling process – the longer the sap is boiled in the pan, the darker and stronger the flavors become. Flavor can also be affected by the tree’s qualities and genetics; by the time of year and method through which sap is collected; and by the cleanliness of the boiling room and storage containers. Please refer to the section “How to Make Maple Syrup” for more details on the syrup making process.
Do I need special tools for boiling?
You will need an outside method of boiling down your sap. Most people use a shallow evaporator pan over a wood fire for the first stage of boiling and then a stainless steel pot on a propane burner or outside stove for the finishing stage. You will also need a candy-type thermometer with a readable, one-degree scale; food-grade, syrup-specific filters; glass jars with sealable lids; and general kitchen tools such as funnels, towels, and wooden spoons. The boiling process is covered in full detail in our book, Guide to Maple Tapping.
How long does it take to boil down the sap?
The rate at which your water will evaporate depends on numerous factors such as: pan size and construction; type of heat source; and even the temperature of sap being added to the evaporator. If using a shallow, rectangular pan with lots of surface area, it takes between 9 and 18 hours to produce one gallon of syrup. With a deep, circular pan, it can take as little as 28 hours and as long as 56 hours.
Why is my syrup cloudy or crystallized?
This sugar sand, or niter, is sometimes left if your syrup was not filtered enough. It can also be created by boiling the sap too far past the finishing point. In either case, it does not affect the quality of your syrup and will usually sink to the bottom during storage. You can reheat your syrup and put it through another filtering to remove the sugar sand. We strongly recommend following our two-step filtering process, shown here. We designed these smaller, one-quart filters for the home sugarmaker -- they are much easier to handle (so less spills of boiling hot syrup) and they're washable and reusable. These are the filters we use ourselves.
Can I use maple syrup instead of sugar in my cooking?
It is a good substitute but will impart a maple flavor to your dish. Generally, one cup of pure maple syrup equals one cup of sugar and can be swapped out in most recipes. For cookies and cakes that also use liquid ingredients, just reduce the liquids by three tablespoons for each cup of maple syrup used.
How should I store my finished syrup?
Properly bottled and sealed pure maple syrup should be stored in a cool, dry, dark place and will keep for up to one year. Maple syrup can also be frozen indefinitely – it will not harden, though, due to the high sugar content. Once opened, syrup should be stored in the refrigerator and used within six months of opening. If you notice any mold or discoloration, discard the contents as it may not be safe to eat. Also, do not store your syrup in plastic containers as the syrup may absorb odd flavors or odors.
We are sugarmakers, too, and will be tapping right along beside you. Please send us your questions and we will find the answer for you.